
Do you want to track website data but have to bother engineers every time? Do you want to do it yourself but can’t understand the code? GTM (Google Tag Manager) is a lifesaver for marketers!
GTM allows you to set up tracking codes yourself and manage GA4 and FB pixels at once, without writing any code.
This article will guide you step-by-step to understand what GTM is, its operational logic, and practical setup examples, allowing you to confidently master data and enhance your marketing decisions.
I. What is GTM (Google Tag Manager)? How should marketers understand this tool?
In the world of digital marketing, “tracking” is key. You need to know where users come from, what they click, and what conversion actions they complete.
However, this seemingly simple data collection often involves a lot of code or requires the assistance of engineers to obtain the data correctly.
This is where Google Tag Manager (GTM for short) becomes a powerful assistant for marketers.
What are the basic structures of GTM: Tags, Triggers, and Variables?
We can think of GTM as a “central control room for marketing tracking,” allowing marketers to freely add, edit, and manage various tracking codes (Tags) without touching any code.
GTM has five basic structures: Accounts, Containers, Tags, Triggers, and Variables.
| Name | How do marketers understand it? | Practical Uses and Examples |
| Accounts | Like the “headquarters” of the company or brand you manage. | A company creates one account, which can contain multiple containers. |
| Containers | The “tracking workspace” for each website or app. | Create separate containers for Website A and Website B to manage tracking codes independently. |
| Tags | The tracking tasks to be executed. | Add tracking codes like GA4, Facebook Pixel, Hotjar, etc. |
| Triggers | Under what circumstances should a Tag be executed? | Examples: user clicks a button, reaches the checkout page, scrolls more than halfway down the page |
| Variables | Details of the conditions, such as auxiliary information for the Tag | Examples: clicked text content, button ID, current URL, product name, etc. |
In simple terms, you can use GTM to set: “When a user clicks the add-to-cart button (Trigger), send an event to GA4 (Tag) and record which product it is (Variable).” No need to ask an engineer to manually modify the code!
Still not clear? Let’s see what the official source says:
Why is GTM important for marketers?
- Reduce reliance on engineers: Many marketing activities (such as tracking ad performance, embedding GA events) can be set up by yourself without waiting for engineers to schedule them.
- Adjust tracking strategy in real-time: When an ad campaign changes, the tracking logic also needs to change. With GTM, you can quickly and flexibly adjust and update in real-time.
- Centralized management of tracking codes: All tracking codes are managed on one platform, preventing slow website loading speeds or tracking errors.
Are GTM and GA4 the same tool? How do I use them together?
Many people mistakenly think that GA4 is GTM, or that if they have GA, they don’t need GTM. In fact, they are completely different tools:
- GA4 :Data Platform, responsible for receiving and displaying data.
- GTM :Data Porter, helps you decide what data, when, and to which platform it should be sent.
You can use GTM to send specific behaviors (such as clicks, scrolls, dwell time, etc.) to GA4, Meta, Google Ads, or other analytics platforms.
For example, many brands use Meta to advertise their products. In this case, GTM is your best tool for tracking website performance. You can install Facebook Pixel through GTM:
- Create a new Tag in GTM → Select “Custom HTML” → Paste Facebook Pixel (FB pixel code)
- Set Trigger → Select “All Pages”
- Save and publish, and the setup is complete!
This process allows you to deploy the FB pixel from start to finish without writing a single line of JavaScript. For marketers, this is the crucial first step to achieving precise targeting and performance tracking.
You might also like:GA4 Tutorial | Easily Understand Website Traffic Sources, Gain Insights, and Seize SEO Optimization Opportunities
2. GTM Setup Tutorial | Activating Tracking Logic “Without Writing Code”
When first encountering GTM, many marketers might find the interface looks like a tool exclusively for engineers.
However, once you’re familiar with a few core concepts and setup steps, you can quickly complete various tracking tasks even if you can’t write any code at all.
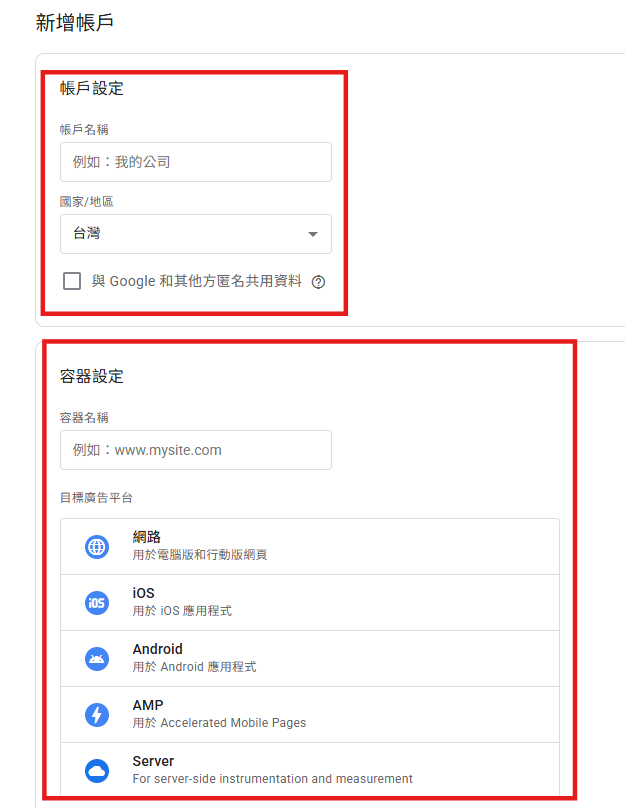
Step 1: Create a GTM Account and Container
1. Go to the Google Tag Manager official website and log in with your Google account. Click “Create Account”.
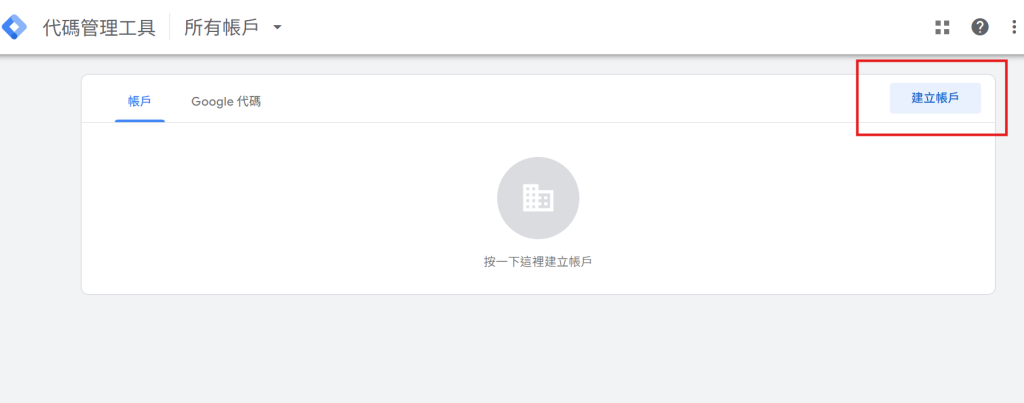
2. Add a new account, enter the account name (usually your company name), then create a “container”: enter the website name, select the platform (e.g., “Web”).
3. After creation, a “GTM code” will be generated:You will see two<script>code snippets, which need to be placed in your website’s<head>and<body>.
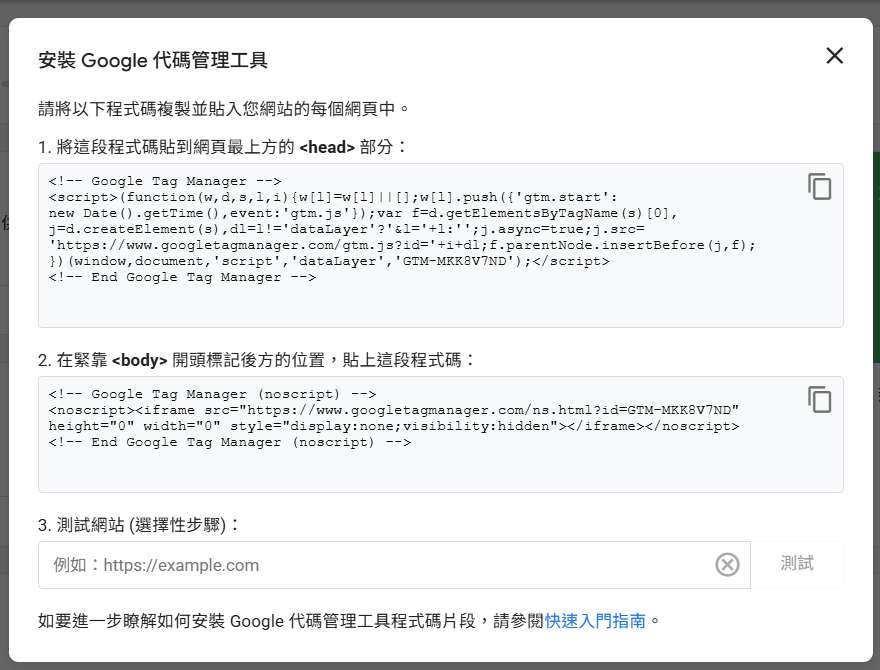
But don’t worry, if you are using a CMS like WordPress or Shopify, you can usually embed it automatically by installing the corresponding plugin.
Official tutorial reference settings:Google Official Instructions | Install GTM container code on your website
Step 2: Use GTM to add GA4 tracking code (no coding required)
Assuming you have already created a GA4 account, now embed the tracking code into your website via GTM:
1. Add a new Tag in GTM → Select “Google Analytics: GA4 Configuration”
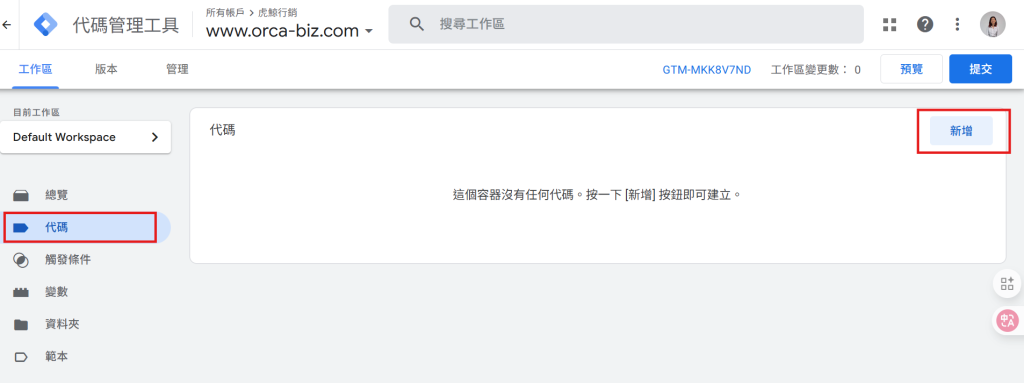
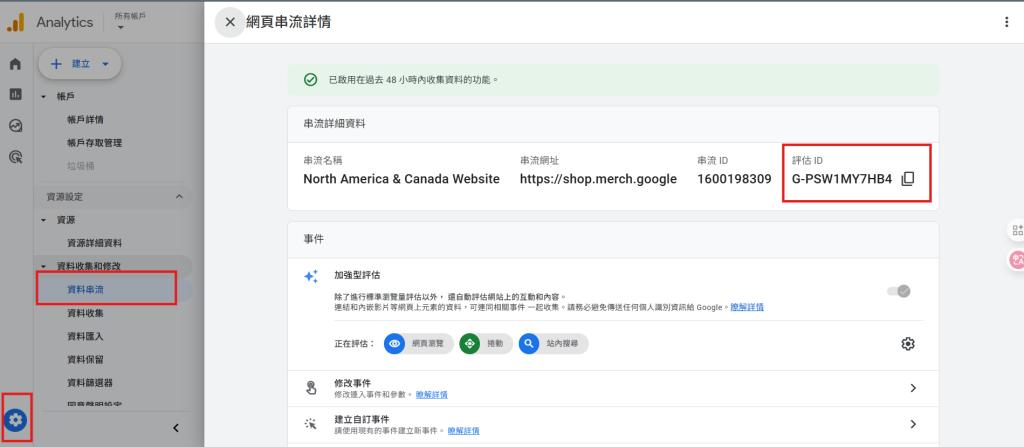
2. Paste your GA4 “Measurement ID” (e.g., G-XXXXXXXXXX) & Event Name (Specify the event name. For best results, use recommended event names.)
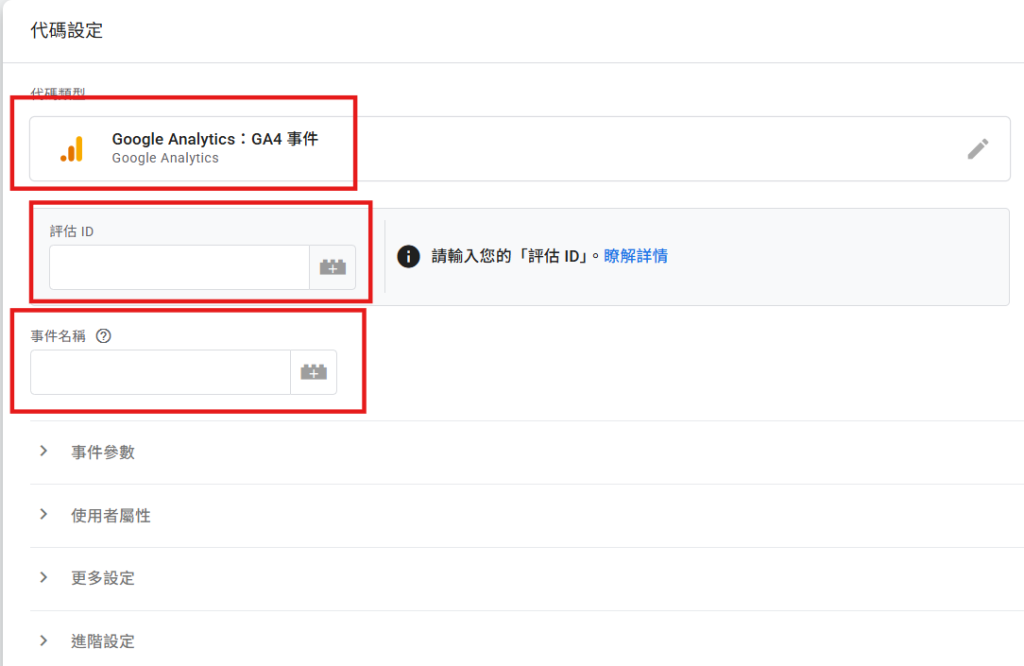
You can find your Measurement ID in GA4 under ‘Admin’ → ‘Data Collection and Modification’ → ‘Data Streams’.
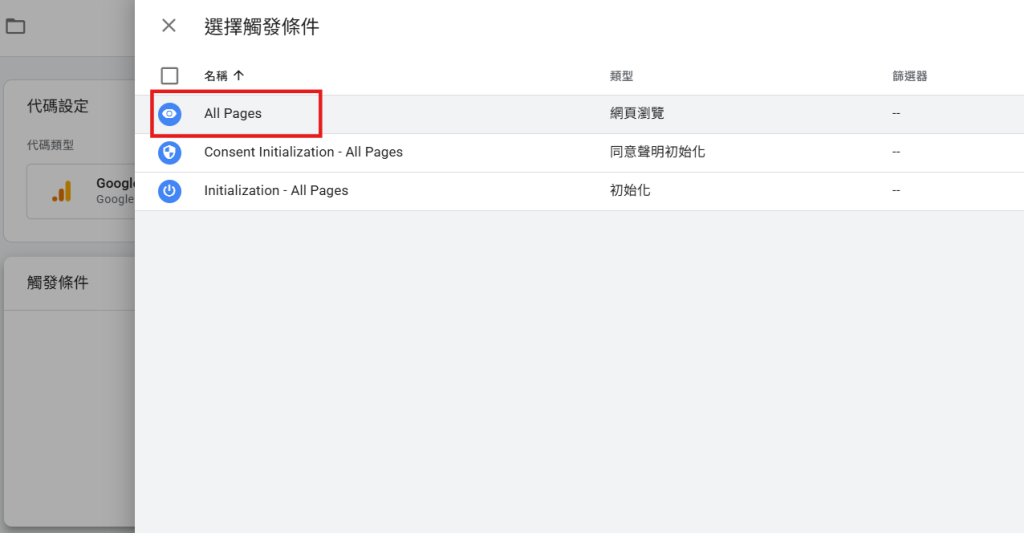
3. Select “All Pages” as the trigger condition to enable it every time a page loads.
4. After saving, click “Submit” in the upper right corner → Publish Changes
Once completed, GA4 will automatically start collecting website data, such as page views and user numbers.
Official operational guide:Install GA4 configuration tags using GTM
Step 3: Track specific behaviors (e.g., button clicks)
In addition to basic tracking of overall site views, GTM’s more powerful feature is its ability to set up “custom event tracking.”
For example, when users click the “Add to Cart” button or view a specific page.
Example: Create an event to track button clicks
Create Triggers
- Select “Click – All Elements” for the trigger type.
- Set condition: “Click Text contains ‘Add to Cart'”
Create Tag:
- Select “GA4 Event”
- Customize the event name, for example, “add_to_cart”
- Select the Trigger you just configured
- Publish the changes and use Preview mode to test if the event is successfully sent.
This way, your GA4 reports will start recording every “add to cart” click, allowing the marketing team to analyze conversion behavior more accurately.
Official resources for reference:Using GTM to send GA4 custom events
Friendly reminder: Make good use of “Preview Mode” to verify if tracking is working correctly.
Before publishing any tracking, click on GTM’s “Preview” mode, enter your website URL, and enter the testing state. This helps you instantly confirm:
- Is the Tag firing correctly?
- Are the Trigger conditions met?
- Are the event names and content sent to GA4 as expected?
This step is like a “rehearsal mode” before an ad goes live, which can significantly reduce the risk of tracking errors.
You might also like:GA4 Tutorial | Understand User Browsing Experience, Web Experience, and Common Devices
What to Pay Attention to When Using GTM? These Tips Will Help You Make Better Use of the Tool
- Consistent and Clear Naming Conventions: It is recommended that naming formats be consistent and clear from the initial setup, such as: GA4 – Button Click – Add to Cart. Good naming conventions make it easy for you and your team to identify at a glance during future maintenance, searching, or analysis.
- Make Good Use of the Data LayerTrack more details with variables: For example, to track the product name or price that a user clicks, you need to pass additional information to GTM. Even if you don’t know how to code, you can ask an engineer to help set it up once, and then you can freely extract the data later.
- Send every event using the GA4 custom event structure: It is recommended to use a consistent format for event names, such as: purchase_success, add_to_cart, to facilitate report creation in GA4.
- Create Versions and Change History: GTM supports “version control.” It is recommended to enter notes every time you modify a Tag or Trigger, which makes it easier to restore and track historical settings later.
Conclusion: Learn GTM, and data will no longer be exclusive to engineers
For modern marketers, learning to use Google Tag Manager is not just about “accelerating tracking deployment”; it’s a data capability that enables real-time and autonomous marketing decisions.
From GA4 event tracking and Facebook Pixel to other analytics platforms, GTM allows you to create precise and flexible tracking mechanisms without needing to write code, helping you transition from “intuitive operations” to “data-driven” marketing expertise.
If you still find GTM setup too complex during implementation, encounter situations where triggers don’t fire, or can’t determine if data is being collected correctly,
feel free to contact us anytime. We have a professional marketing technology team that can help you customize the most suitable GTM tracking logic.
References:
Frequently Asked Questions
What is Google Tag Manager (GTM)?
Google Tag Manager (GTM) is a free tool that helps marketers install and manage tracking codes (such as GA4, Facebook Pixel, Hotjar) themselves without needing to write code. It centralizes tracking logic through an architecture of accounts, containers, Tags, Triggers, and Variables, making data collection faster and more flexible.
What is the difference between GTM and GA4?
GA4 is a data platform responsible for receiving and displaying data; GTM is a data transporter that determines what data, under what circumstances, is sent to which platform. The two are complementary. A common practice is to use GTM to send user behavior (such as clicks, time on page) to GA4 for analysis.
How to use GTM to install GA4 tracking code?
The steps are as follows: 1) Create a new Tag in GTM, select “Google Analytics: GA4 Configuration”; 2) Paste your GA4 Measurement ID (G-XXXXXXXXXX); 3) Set the Trigger to “All Pages”; 4) Save and publish. Once completed, GA4 will start receiving website traffic data.
Can GTM track specific events? For example, button clicks?
Yes, you can. You can create a Trigger in GTM (for example: a click event, with the condition “Click Text contains Add to Cart”), then create a GA4 event Tag (for example, event name add_to_cart), and bind it to that Trigger. After publishing, every time a user clicks the button, GA4 will record that event.
What are the best practices for using GTM?
Recommendations: 1) Use a consistent and clear naming convention (e.g., GA4 – Button Click – Add to Cart); 2) Make good use of the Data Layer and variables to track more details (e.g., product name, price); 3) Standardize event names for easier GA4 report analysis; 4) Utilize version control and leave notes when making changes; 5) Use “Preview Mode” to verify settings before publishing.